In this example we are going to build our own dynamics tags, an example is
Power DevBox Shortcut, a Edge/Chrome Extension which creates custom tags to filter your environments by
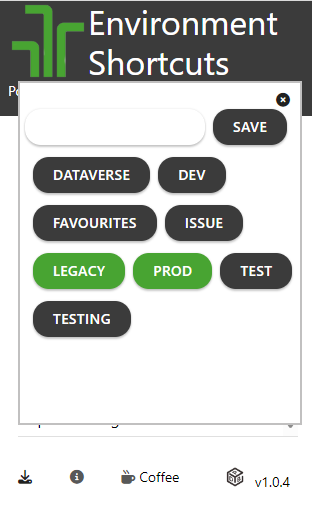
Why Not A Gallery
A Gallery seems like the easy way, but it doesn't allow the tags per row to be dynamic (see how first 2 have 2, then 3, all due to the length of each tag).
Setup
Before we start we need a few components on the screen
- A container (named tags) - this is out box holding the tags, its width sets how may tags per row
- 10 buttons named bu1,bu2,bu3,etc inside the container - these are out tags.
- Gallery - this is used to set the tags text
- onStart collection (named colTags) - this collection contains our tags and key parameters
The Tags (Buttons)
We set the buttons parameters to the collection:
- this makes the buttons width dynamic to the length of text
- Text: LookUp(colTags,button=Self).text
- Visible: LookUp(colTags,button=Self).visible
- X: LookUp(colTags,button=Self).x
- Y: LookUp(colTags,button=Self).y
Calculate the Tags Position
To calculate the Tags position we use a user defined function and a couple of user defined values.
The user defined values are:
flexXY is what the UDF returns and flexIn is the inputs. We use the previous tags X,Y,Width and the tag we want to positions Width(ThisWidth), Height(ThisHeight), the padding we want between the buttons, and finally the width of our container (Tags).
So if we were positioning bu4, padding was 10 and the container was 400 wide then it would look like this:
Y: bu3.X
X: bu3.Y
Width: bu3.Width
ThisWidth: bu4.Width
ThisHeight: bu4.Height
Padding: 10
Tags: 400
The UDF looks like this:
It checks to see if the end of the tag (the previous tags X + previous tags width + padding + tags width+ padding) is greater then the width of the container. If it is it moves it to the next line.
Update the Tags
To update/add tags we use the gallery with the colTags as its data source. Each gallery item has a text input which on change patches the text of the collection, updating the tags.
But because the X,Y parameters are not volatile (they don't get updated unless an interaction) we have to loop over every tag in the collection and recalculate the X,Y, so that they move as well.
Conclusion
And that's it, now when ever a new tag is added it appears in the container, if its to long it wraps to the next line. Best of all its all responsive, so if the container changes or the button changes, everything reacts (more of a challenge then you realise).
This is a series of short blogs designed to help create new components from existing components, keep your eyes out for moreStacked Notification Toasts code snippet widget


