Managing Credentials using Windows Credentail Manager in Power Automate Desktop
In today's digital landscape, managing credentials securely and efficiently is crucial. Power Automate Desktop offers a robust solution for handling credentials through its integration with PowerShell and the CredentialManager module. In this blog, we'll explore how to create a flow that retrieves and displays stored credentials using Power Automate Desktop.
Prerequisites
Before you begin, ensure you have the necessary setup:
- Open Windows PowerShell: Launch Windows PowerShell.
- Install CredentialManager Module: Enter the following command to install the CredentialManager module:
Install-Module -Name CredentialManager -Scope CurrentUser -Force
- Confirm Installation: When prompted, enter Yes or Y to confirm the installation.
With these steps, the setup is complete. Next, create the credentials you want to store as shown in the image below.
Setting Up the Flow
To get started, you'll need to create a new flow in Power Automate Desktop. Here's a step-by-step guide:
- Create a New Flow: Open Power Automate Desktop and create a new flow.
- Add a PowerShell Script Action: Use the Run PowerShell Script action to execute a PowerShell script that retrieves credentials.
PowerShell Script
The PowerShell script below is designed to fetch credentials stored in the Windows Credential Manager. It accepts an array of target names and returns the corresponding usernames and passwords.
function Get-CredentialDetails {
param (
[string[]]$TargetNames # Modify the parameter to accept an array of target names
)
$result = @() # Initialize an array to store the results
try {
# Import the CredentialManager module
Import-Module CredentialManager
# Iterate through each target name
foreach ($targetName in $TargetNames) {
# Get the stored credential
$credential = Get-StoredCredential -Target $targetName
if ($credential) {
# Store the username and password in the result array
$result += @{
TargetName = $targetName
Username = $credential.UserName
Password = $credential.GetNetworkCredential().Password
}
} else {
# Handle case when the credential is not found
$result += @{
TargetName = $targetName
Error = "Credential not found"
}
}
}
return $result
} catch {
Write-Output "Error: $_"
return $null
}
}
# Example usage with an array of target names
$targetNames = @('MouserWebsite', 'teamslv/teams', 'teamsKey/teams')
$details = Get-CredentialDetails -TargetNames $targetNames
if ($details) {
$details | ConvertTo-Json
} else {
'{"error": "No credentials found"}'
}
Integrating the Script in Power Automate Desktop
- Run PowerShell Script: Add the Run PowerShell Script action and paste the script above into the script editor.
- Convert JSON to Custom Object: Use the Convert JSON to Custom Object action to parse the JSON output from the PowerShell script.
- Display Results: Add Show Message actions to display the retrieved credentials.
Example FlowHere's an example of how the flow might look as shown in below image: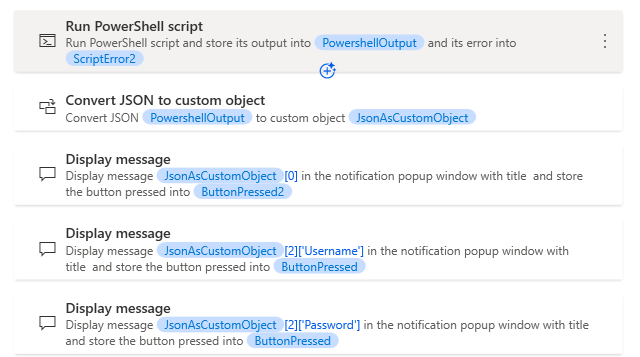
Overcoming Licensing Constraints
While tools like Azure Key Vault and CyberArk provide robust solutions for managing credentials, they require separate licenses, which can be a barrier for some users. To overcome these licensing constraints and use a free method, you can leverage the Windows Credential Manager along with Power Automate Desktop and PowerShell. This approach allows you to securely manage and retrieve credentials without incurring additional costs.
Conclusion
By integrating PowerShell with Power Automate Desktop, you can efficiently manage and retrieve credentials stored in the Windows Credential Manager. This approach enhances security and simplifies the process of handling sensitive information in your automation workflows. Additionally, it provides a cost-effective alternative to using licensed tools like Azure Key Vault and CyberArk.
Feel free to customize the script and flow to suit your specific needs. Happy automating!


