Microsoft’s standard approval emails make it easy to send and capture user feedback directly through Outlook. However, one major limitation is that when multiple users receive the same approval email, only the first response is considered, leaving others frustrated when they try to act on an already-approved request.
To overcome this limitation and deliver a more intuitive, brand-aligned experience, we designed a customized approval interface that not only eliminates confusion but enhances user confidence and professionalism in every interaction.
The Business Challenge: Creating Seamless Email Approvals
While the standard Power Automate approval system works for basic tasks, it lacks flexibility—especially in providing clear feedback when a request has already been completed.
Our goal was to create a smarter, smoother process where each user action leads to a clean confirmation page that reflects the brand identity.
Most importantly, if a user tries to respond to a completed request, they see a clear “Already Processed” message instead of an error—ensuring a consistent, frustration-free experience.
Step 1: Create a Flow to send the Email
The initial process issues the approval request but does not pause for a response.
Start with a Trigger

- Depending on your configuration, you may utilize:
- “When a row is created, altered, or removed” (Dynamics 365)
Add Action “Send an email (V2)”
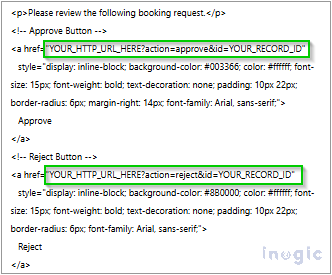
- Create a custom email body where you can add parameters that you are using in 2nd
- Change your email body to HTML format to create your personalized buttons.
Pro Tip: Design your buttons with clear labels like ‘Approve’ or ‘Reject,’ using colors that align with your brand guidelines. This helps users instantly recognize and act

- Ensure that each button contains a distinct record identifier for future reference...Read More>>


